Jihoon's IT Development

Web Developer's Hobby Development Notes

Spring boot의 ComponentScan 과 application.yml

Spring Boot로 제작한 Application을 다른 Application에서 가져다 사용해보자.

Spring Boot를 기반으로 제작한 Application을 다른 Application에서 가져다 사용하는 방법에 대해 알아보고, 문제가 될 수 있는 부분을 찾아본다.

1. 개요

  • Spring boot 를 기반으로 한 Demo1 제작
  • Demo1에서 application.yml에 값(value)을 입력
  • Demo1을 실행하여 application.yml의 값의 출력을 확인.
  • Demo1 packaging
  • Demo1의 jar 내부에 application.yml이 존재함을 확인.
  • Demo1에 대한 의존성을 가지고있는 Demo2를 작성
  • Demo2에서 Demo1의 application.yml 값을 가져와지는지 확인.

2. Demo1

Spring Boot 를 기반으로 한 Demo1을 제작합니다.
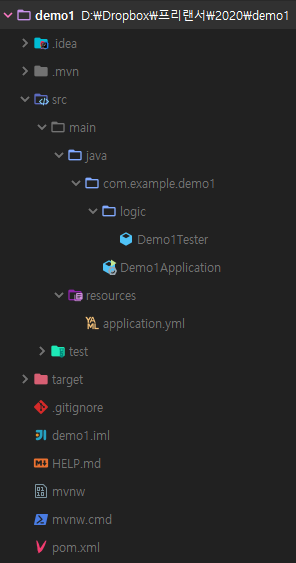
2.1. 폴더구성

  • 실행을 위한 Demo1Application.java가 존재
  • application.yml의 값을 가져오기 위한 Demo1Tester.java가 위치

2.2. pom.xml

1
2
3
4
5
6
7
8
9
10
11
12
13
14
15
16
17
18
19
20
21
22
23
24
25
26
27
28
29
30
31
32
33
34
35
36
37
38
39
40
41
42
43
44
45
46
47
48
49
50
51
52
53
54
<?xml version="1.0" encoding="UTF-8"?>
<project xmlns="http://maven.apache.org/POM/4.0.0" xmlns:xsi="http://www.w3.org/2001/XMLSchema-instance"
xsi:schemaLocation="http://maven.apache.org/POM/4.0.0 https://maven.apache.org/xsd/maven-4.0.0.xsd">
<modelVersion>4.0.0</modelVersion>
<parent>
<groupId>org.springframework.boot</groupId>
<artifactId>spring-boot-starter-parent</artifactId>
<version>2.2.2.RELEASE</version>
<relativePath/> <!-- lookup parent from repository -->
</parent>
<groupId>com.example</groupId>
<artifactId>demo1</artifactId>
<version>0.0.1-SNAPSHOT</version>
<name>demo1</name>
<description>Demo project for Spring Boot</description>

<properties>
<java.version>1.8</java.version>
</properties>

<dependencies>
<dependency>
<groupId>org.springframework.boot</groupId>
<artifactId>spring-boot-starter</artifactId>
</dependency>

<dependency>
<groupId>org.projectlombok</groupId>
<artifactId>lombok</artifactId>
<optional>true</optional>
</dependency>
<dependency>
<groupId>org.springframework.boot</groupId>
<artifactId>spring-boot-starter-test</artifactId>
<scope>test</scope>
<exclusions>
<exclusion>
<groupId>org.junit.vintage</groupId>
<artifactId>junit-vintage-engine</artifactId>
</exclusion>
</exclusions>
</dependency>
</dependencies>

<build>
<plugins>
<plugin>
<groupId>org.springframework.boot</groupId>
<artifactId>spring-boot-maven-plugin</artifactId>
</plugin>
</plugins>
</build>

</project>

lombok 이외에는 특별한거 하나 없는 intellij 기본 생성 Spring Boot Application이다.

2.3. application.yml

test.example.value 의 값으로 demo1을 세팅한다.

1
2
3
test:
example:
value: demo1

2.4. Demo1Tester.java

application.yml의 값을 가져오기 위한 Class
Autowired 테스트를 위해 @Component로 선언한다.

1
2
3
4
5
6
7
8
9
10
import lombok.Data;
import org.springframework.beans.factory.annotation.Value;
import org.springframework.stereotype.Component;

@Data
@Component
public class Demo1Tester {
@Value("${test.example.value}")
private String value;
}

2.5. Demo1Application.java

Demo1Tester를 autowired 한 뒤 value 의 값을 가져와 log로 출력한다.

1
2
3
4
5
6
7
8
9
10
11
12
13
14
15
16
17
18
19
20
21
22
23
24
25
26
import com.example.demo1.logic.Demo1Tester;
import lombok.extern.slf4j.Slf4j;
import org.springframework.beans.factory.annotation.Autowired;
import org.springframework.boot.CommandLineRunner;
import org.springframework.boot.SpringApplication;
import org.springframework.boot.autoconfigure.SpringBootApplication;

@Slf4j
@SpringBootApplication
public class Demo1Application implements CommandLineRunner {

private final Demo1Tester tester;

public Demo1Application(Demo1Tester tester) {
this.tester = tester;
}

public static void main(String[] args) {
SpringApplication.run(Demo1Application.class, args);
}

@Override
public void run(String... args) throws Exception {
log.info("demo1 : tester.getValue() : {}", tester.getValue());
}
}

2.6. Demo1 실행결과

1
2
3
4
5
6
7
8
9
10
11
12
  .   ____          _            __ _ _
/\\ / ___'_ __ _ _(_)_ __ __ _ \ \ \ \
( ( )\___ | '_ | '_| | '_ \/ _` | \ \ \ \
\\/ ___)| |_)| | | | | || (_| | ) ) ) )
' |____| .__|_| |_|_| |_\__, | / / / /
=========|_|==============|___/=/_/_/_/
:: Spring Boot :: (v2.2.2.RELEASE)

2020-01-03 22:53:54.010 INFO 20040 --- [ main] com.example.demo1.Demo1Application : Starting Demo1Application on park-PC with PID 20040 (started by park in D:\Dropbox\프리랜서\2020\demo1)
2020-01-03 22:53:54.014 INFO 20040 --- [ main] com.example.demo1.Demo1Application : No active profile set, falling back to default profiles: default
2020-01-03 22:53:54.752 INFO 20040 --- [ main] com.example.demo1.Demo1Application : Started Demo1Application in 1.351 seconds (JVM running for 5.656)
2020-01-03 22:53:54.754 INFO 20040 --- [ main] com.example.demo1.Demo1Application : tester.getValue() : demo1

demo1이 출력되는 것을 확인할 수 있다.

2.7. Demo1 packaging

Spring Boot의 repackage를 스킵하도록 한다.

1
2
3
4
5
6
7
8
9
10
11
12
13
14
15
16
17
18
19
20
21
22
23
24
25
26
27
28
29
30
31
32
33
34
35
36
37
38
39
40
41
42
43
44
45
> mvn clean install -DskipTests -Dspring-boot.repackage.skip=true
[INFO] Scanning for projects...
[INFO]
[INFO] -------------------------< com.example:demo1 >--------------------------
[INFO] Building demo1 0.0.1-SNAPSHOT
[INFO] --------------------------------[ jar ]---------------------------------
[INFO]
[INFO] --- maven-clean-plugin:3.1.0:clean (default-clean) @ demo1 ---
[INFO] Deleting D:\Dropbox\프리랜서\2020\demo1\target
[INFO]
[INFO] --- maven-resources-plugin:3.1.0:resources (default-resources) @ demo1 ---
[INFO] Using 'UTF-8' encoding to copy filtered resources.
[INFO] Copying 1 resource
[INFO] Copying 0 resource
[INFO]
[INFO] --- maven-compiler-plugin:3.8.1:compile (default-compile) @ demo1 ---
[INFO] Changes detected - recompiling the module!
[INFO] Compiling 2 source files to D:\Dropbox\프리랜서\2020\demo1\target\classes
[INFO]
[INFO] --- maven-resources-plugin:3.1.0:testResources (default-testResources) @ demo1 ---
[INFO] Using 'UTF-8' encoding to copy filtered resources.
[INFO] skip non existing resourceDirectory D:\Dropbox\프리랜서\2020\demo1\src\test\resources
[INFO]
[INFO] --- maven-compiler-plugin:3.8.1:testCompile (default-testCompile) @ demo1 ---
[INFO] Changes detected - recompiling the module!
[INFO] Compiling 1 source file to D:\Dropbox\프리랜서\2020\demo1\target\test-classes
[INFO]
[INFO] --- maven-surefire-plugin:2.22.2:test (default-test) @ demo1 ---
[INFO] Tests are skipped.
[INFO]
[INFO] --- maven-jar-plugin:3.1.2:jar (default-jar) @ demo1 ---
[INFO] Building jar: D:\Dropbox\프리랜서\2020\demo1\target\demo1-0.0.1-SNAPSHOT.jar
[INFO]
[INFO] --- spring-boot-maven-plugin:2.2.2.RELEASE:repackage (repackage) @ demo1 ---
[INFO]
[INFO] --- maven-install-plugin:2.5.2:install (default-install) @ demo1 ---
[INFO] Installing D:\Dropbox\프리랜서\2020\demo1\target\demo1-0.0.1-SNAPSHOT.jar to C:\Users\park\.m2\repository\com\example\demo1\0.0.1-SNAPSHOT\demo1-0.0.1-SNAPS
HOT.jar
[INFO] Installing D:\Dropbox\프리랜서\2020\demo1\pom.xml to C:\Users\park\.m2\repository\com\example\demo1\0.0.1-SNAPSHOT\demo1-0.0.1-SNAPSHOT.pom
[INFO] ------------------------------------------------------------------------
[INFO] BUILD SUCCESS
[INFO] ------------------------------------------------------------------------
[INFO] Total time: 24.001 s
[INFO] Finished at: 2020-01-03T22:55:24+09:00
[INFO] ------------------------------------------------------------------------

2.8. Demo1.jar

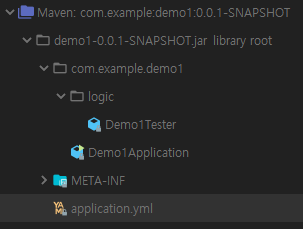
application.yml 이 포함되었음을 확인할 수 있다.

3. Demo2

Demo1에 의존성을 가지고 있는 Demo2를 생성한다.
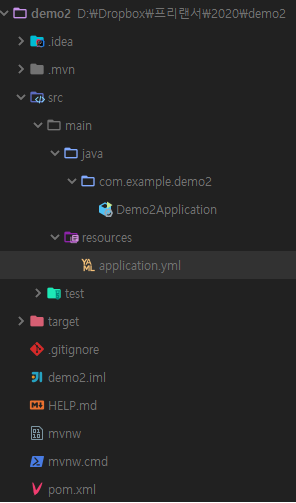
3.1. 폴더구성

  • 실행을 위한 Demo2Application.java가 존재
  • 여러가지 케이스 테스트를 위한 application.yml 존재

3.2. pom.xml

demo1 의 라이브러리를 dependency에 추가한다.

1
2
3
4
5
6
7
8
9
10
11
12
13
14
15
16
17
18
19
20
21
22
23
24
25
26
27
28
29
30
31
32
33
34
35
36
37
38
39
40
41
42
43
44
45
46
47
48
49
50
51
52
53
54
55
56
57
58
59
<?xml version="1.0" encoding="UTF-8"?>
<project xmlns="http://maven.apache.org/POM/4.0.0" xmlns:xsi="http://www.w3.org/2001/XMLSchema-instance"
xsi:schemaLocation="http://maven.apache.org/POM/4.0.0 https://maven.apache.org/xsd/maven-4.0.0.xsd">
<modelVersion>4.0.0</modelVersion>
<parent>
<groupId>org.springframework.boot</groupId>
<artifactId>spring-boot-starter-parent</artifactId>
<version>2.2.2.RELEASE</version>
<relativePath/> <!-- lookup parent from repository -->
</parent>
<groupId>com.example</groupId>
<artifactId>demo2</artifactId>
<version>0.0.1-SNAPSHOT</version>
<name>demo2</name>
<description>Demo project for Spring Boot</description>

<properties>
<java.version>1.8</java.version>
</properties>

<dependencies>
<dependency>
<groupId>org.springframework.boot</groupId>
<artifactId>spring-boot-starter</artifactId>
</dependency>
<dependency>
<groupId>com.example</groupId>
<artifactId>demo1</artifactId>
<version>0.0.1-SNAPSHOT</version>
</dependency>

<dependency>
<groupId>org.projectlombok</groupId>
<artifactId>lombok</artifactId>
<optional>true</optional>
</dependency>
<dependency>
<groupId>org.springframework.boot</groupId>
<artifactId>spring-boot-starter-test</artifactId>
<scope>test</scope>
<exclusions>
<exclusion>
<groupId>org.junit.vintage</groupId>
<artifactId>junit-vintage-engine</artifactId>
</exclusion>
</exclusions>
</dependency>
</dependencies>

<build>
<plugins>
<plugin>
<groupId>org.springframework.boot</groupId>
<artifactId>spring-boot-maven-plugin</artifactId>
</plugin>
</plugins>
</build>

</project>

3.3. Demo2Application.java

@ComponentScan 으로 demo1의 @Component를 탐색한다.
Demo1Tester Class를 Autowired 한다.
value 값을 출력한다.

1
2
3
4
5
6
7
8
9
10
11
12
13
14
15
16
17
18
19
20
21
22
23
24
25
26
27
28
import com.example.demo1.logic.Demo1Tester;
import lombok.extern.slf4j.Slf4j;
import org.springframework.beans.factory.annotation.Autowired;
import org.springframework.boot.CommandLineRunner;
import org.springframework.boot.SpringApplication;
import org.springframework.boot.autoconfigure.SpringBootApplication;
import org.springframework.context.annotation.ComponentScan;

@Slf4j
@SpringBootApplication
@ComponentScan(basePackages = {"com.example.demo1", "com.example.demo2"})
public class Demo2Application implements CommandLineRunner {

private final Demo1Tester tester;

public Demo2Application(Demo1Tester tester) {
this.tester = tester;
}

public static void main(String[] args) {
SpringApplication.run(Demo2Application.class, args);
}

@Override
public void run(String... args) throws Exception {
log.info("demo2 : tester.getValue() : {}", tester.getValue());
}
}

4. 결과

4.1. 시나리오1

기본실행

  • Demo2 application.yml 삭제 (null)
  • Demo2Application 실행
1
2
3
4
5
2020-01-04 00:10:06.508  INFO 2968 --- [           main] com.example.demo2.Demo2Application       : Starting Demo2Application on park-PC with PID 2968 (started by park in D:\Dropbox\프리랜서\2020\demo2)
2020-01-04 00:10:06.514 INFO 2968 --- [ main] com.example.demo2.Demo2Application : No active profile set, falling back to default profiles: default
2020-01-04 00:10:07.687 INFO 2968 --- [ main] com.example.demo2.Demo2Application : Started Demo2Application in 1.853 seconds (JVM running for 3.188)
2020-01-04 00:10:07.693 INFO 2968 --- [ main] com.example.demo2.Demo2Application : demo2 : tester.getValue() : demo1
2020-01-04 00:10:07.695 INFO 2968 --- [ main] com.example.demo1.Demo1Application : demo1 : tester.getValue() : demo1

demo1과 demo2의 값이 demo1로 출력되는 것을 확인.
demo1 : tester.getValue 은 demo2에 포함되는 코드가 아님에도 출력됐음을 확인.

4.2. 시나리오2

  • Demo2에 application.yml 추가 (empty)
  • Demo2Application 실행
1
2
3
4
5
6
7
8
9
2020-01-04 00:16:29.628  INFO 14512 --- [           main] com.example.demo2.Demo2Application       : Starting Demo2Application on park-PC with PID 14512 (started by park in D:\Dropbox\프리랜서\2020\demo2)
2020-01-04 00:16:29.636 INFO 14512 --- [ main] com.example.demo2.Demo2Application : No active profile set, falling back to default profiles: default
2020-01-04 00:16:30.569 WARN 14512 --- [ main] s.c.a.AnnotationConfigApplicationContext : Exception encountered during context initialization - cancelling refresh attempt: org.springframework.beans.factory.UnsatisfiedDependencyException: Error creating bean with name 'demo2Application': Unsatisfied dependency expressed through constructor parameter 0; nested exception is org.springframework.beans.factory.BeanCreationException: Error creating bean with name 'demo1Tester': Injection of autowired dependencies failed; nested exception is java.lang.IllegalArgumentException: Could not resolve placeholder 'test.example.value' in value "${test.example.value}"
2020-01-04 00:16:30.583 INFO 14512 --- [ main] ConditionEvaluationReportLoggingListener :

Error starting ApplicationContext. To display the conditions report re-run your application with 'debug' enabled.
2020-01-04 00:16:30.623 ERROR 14512 --- [ main] o.s.boot.SpringApplication : Application run failed

org.springframework.beans.factory.UnsatisfiedDependencyException: Error creating bean with name 'demo2Application': Unsatisfied dependency expressed through constructor parameter 0; nested exception is org.springframework.beans.factory.BeanCreationException: Error creating bean with name 'demo1Tester': Injection of autowired dependencies failed; nested exception is java.lang.IllegalArgumentException: Could not resolve placeholder 'test.example.value' in value "${test.example.value}"

test.example.value 값이 존재하지 않아 Spring boot 실행 시 에러 발생

4.3. 시나리오3

  • Demo2에 application.yml에 값 추가
  • Demo2Application 실행

demo2/application.yml

1
2
3
test:
example:
value: demo2

결과

1
2
3
4
5
2020-01-04 00:18:22.742  INFO 19544 --- [           main] com.example.demo2.Demo2Application       : Starting Demo2Application on park-PC with PID 19544 (started by park in D:\Dropbox\프리랜서\2020\demo2)
2020-01-04 00:18:22.750 INFO 19544 --- [ main] com.example.demo2.Demo2Application : No active profile set, falling back to default profiles: default
2020-01-04 00:18:23.970 INFO 19544 --- [ main] com.example.demo2.Demo2Application : Started Demo2Application in 1.969 seconds (JVM running for 3.285)
2020-01-04 00:18:23.973 INFO 19544 --- [ main] com.example.demo2.Demo2Application : demo2 : tester.getValue() : demo2
2020-01-04 00:18:23.974 INFO 19544 --- [ main] com.example.demo1.Demo1Application : demo1 : tester.getValue() : demo2

demo1과 demo2의 값이 demo2로 출력되는 것을 확인.
demo1 : tester.getValue 은 demo2에 포함되는 코드가 아님에도 출력됐음을 확인.

4.4. 결론

  • jar 내부 application.yml@ComponentScan 시 값이 읽힐 수 있다.
    • 다만 jar를 import 하는 application의 application.yml이 아예 존재하지 않아야 한다.
  • 실행되는 application에 application.yml 설정파일이 존재한다면 jar내부의 application.yml무시된다.
    • 실행되는 application의 application.yml 내부 값이 적용된다.

5. 추가

  • @ComponentScan 시 basePackages 설정에 대한 고민

위의 테스트에서 자꾸 demo2에 포함되지 않는 demo1의 코드가 실행되는 것을 알 수 있다. 이는 @ComponentScan의 basePackages에 com.example.demo1 로 설정되어있기 때문이다. (원하지 않는 Demo1Application이 실행될 수 있다는 이야기다.)
따라서 다른 Application의 Component를 사용할 경우에는 최소한의 범위로 선언해서 사용할 수 있도록 해야한다.

@ComponentScan(basePackages = {"com.example.demo2", "com.example.demo1.logic"})

1
2
3
4
2020-01-04 00:23:49.949  INFO 10644 --- [           main] com.example.demo2.Demo2Application       : Starting Demo2Application on park-PC with PID 10644 (started by park in D:\Dropbox\프리랜서\2020\demo2)
2020-01-04 00:23:49.954 INFO 10644 --- [ main] com.example.demo2.Demo2Application : No active profile set, falling back to default profiles: default
2020-01-04 00:23:51.010 INFO 10644 --- [ main] com.example.demo2.Demo2Application : Started Demo2Application in 1.862 seconds (JVM running for 3.134)
2020-01-04 00:23:51.012 INFO 10644 --- [ main] com.example.demo2.Demo2Application : demo2 : tester.getValue() : demo2

com.example.demo1.logic 으로 선언했을 경우 Demo1Application 이 실행되지 않는것을 확인할 수 있다.

Spring Boot와 함께하는 Pivotal Gemfire 간단예제(2)

목차

  1. Pivotal Gemfire 다운로드 및 설치, 기본 설정
  2. Spring Boot를 이용한 Gemfire 이용

지난시간에 이어서 간단한 테스트용 Region 생성과 Data 를 Region 안에 넣고 빼는 샘플 프로젝트를 제작해보자.

완성된 소스는 여기서 확인 가능하다.

https://github.com/Park-jihoon/gemfire-demo

Region 생성

우선 gfsh 를 이용해 region 을 생성하자. region은 일반적인 DataBase로 치면 Table과 비슷한 역할을 하는 것으로 생성 시 많은 옵션을 줄 수 있다.

생성시 옵션은 대략 아래와 같다.

1
2
3
4
5
6
7
8
9
10
11
12
13
14
15
16
17
18
19
20
21
22
23
24
create region --name=value [--type=value] [--template-region=value]
[--groups=value(,value)*] [--if-not-exists(=value)?]
[--key-constraint=value] [--value-constraint=value]
[--enable-statistics=value] [--entry-idle-time-expiration=value]
[--entry-idle-time-expiration-action=value]
[--entry-time-to-live-expiration=value]
[--entry-time-to-live-expiration-action=value]
[--entry-idle-time-custom-expiry=value] [--entry-time-to-live-custom-expiry=value]
[--region-idle-time-expiration=value]
[--region-idle-time-expiration-action=value]
[--region-time-to-live-expiration=value]
[--region-time-to-live-expiration-action=value] [--disk-store=value]
[--enable-synchronous-disk=value] [--enable-async-conflation=value]
[--enable-subscription-conflation=value] [--cache-listener=value(,value)*]
[--cache-loader=value] [--cache-writer=value]
[--async-event-queue-id=value(,value)*]
[--gateway-sender-id=value(,value)*] [--enable-concurrency-checks=value]
[--enable-cloning=value] [--concurrency-level=value]
[--colocated-with=value] [--local-max-memory=value]
[--recovery-delay=value] [--redundant-copies=value]
[--startup-recovery-delay=value] [--total-max-memory=value]
[--total-num-buckets=value] [--compressor=value] [--off-heap(=value)]
[--partition-resolver=value] [--eviction-entry-count=value]
[--eviction-max-memory=value] [--eviction-action=value] [--eviction-object-sizer=value]

우선 region 생성 시 필수값인 nametype만 살펴보자.

  • name
    • region을 해당 값의 이름으로 생성한다.
    • DB의 tableName과 유사
  • type
    • PARTITION, PARTITION_REDUNDANT, REPLICATE, LOCAL, etc.
    • region type 에 따라 많은 타입이 존재하며 원하는 형태의 저장타입을 지정하면 된다.

이번 샘플에서는 아래의 두가지 region만 생성해본다.

1
2
3
4
5
6
7
8
9
10
11
12
gfsh>create region --name=testCache --type=REPLICATE
Member | Status | Message
------- | ------ | ----------------------------------------
server1 | OK | Region "/testCache" created on "server1"

Cluster configuration for group 'cluster' is updated.
gfsh>create region --name=customer --type=REPLICATE
Member | Status | Message
------- | ------ | ---------------------------------------
server1 | OK | Region "/customer" created on "server1"

Cluster configuration for group 'cluster' is updated.

Spring Boot Sample 생성

  • 환경
    • java 1.8 이상
    • Maven
    • Spring boot 2.1.1.RELEASE
    • Spring geode starter 1.2.1.RELEASE
    • SpringFox Swagger 2.9.2

Directory 구조

1
2
3
4
5
6
7
8
9
10
11
12
13
14
15
16
17
18
19
20
Gemfire-demo
|-- pom.xml
`-- src
`-- main
`-- java
`-- ko.co.pohinian.gemfiredemo
|-- GemfireDemoApplication.java
|-- configuration
| |-- GemfireConfiguration.java
| `-- SwaggerConfiguration.java
|-- controller
| |-- CustomerController.java
| `-- TestCacheController.java
|-- entity
| |-- Customer.java
| `-- TestCache.java
|-- repository
| `-- CustomerRepository.java
`-- service
`-- TestCacheService.java

파일 설명

pom.xml

1
2
3
4
5
6
7
8
9
10
11
12
13
14
15
16
17
18
19
20
21
22
23
24
25
26
27
28
29
30
31
32
33
34
35
36
37
38
39
40
41
42
43
44
45
46
47
48
49
50
51
52
53
54
55
56
57
58
<parent>
<groupId>org.springframework.boot</groupId>
<artifactId>spring-boot-starter-parent</artifactId>
<version>2.2.1.RELEASE</version>
<relativePath/> <!-- lookup parent from repository -->
</parent>
<dependencies>
<dependency>
<groupId>org.springframework.boot</groupId>
<artifactId>spring-boot-starter-web</artifactId>
</dependency>

<!-- gemfire -->
<dependency>
<groupId>org.springframework.geode</groupId>
<artifactId>spring-geode-starter</artifactId>
<version>1.2.1.RELEASE</version>
</dependency>

<!-- swagger2 -->
<dependency>
<groupId>io.springfox</groupId>
<artifactId>springfox-swagger2</artifactId>
<version>2.9.2</version>
</dependency>
<dependency>
<groupId>io.springfox</groupId>
<artifactId>springfox-swagger-ui</artifactId>
<version>2.9.2</version>
</dependency>
<!-- swagger2 -->

<!-- lombok -->
<dependency>
<groupId>org.projectlombok</groupId>
<artifactId>lombok</artifactId>
<optional>true</optional>
</dependency>

<!-- test -->
<dependency>
<groupId>org.springframework.boot</groupId>
<artifactId>spring-boot-starter-test</artifactId>
<scope>test</scope>
<exclusions>
<exclusion>
<groupId>org.junit.vintage</groupId>
<artifactId>junit-vintage-engine</artifactId>
</exclusion>
</exclusions>
</dependency>
<dependency>
<groupId>junit</groupId>
<artifactId>junit</artifactId>
<scope>test</scope>
</dependency>
<!-- test -->
</dependencies>

geodeswagger2 관련 라이브러리는 버전을 명시해야 한다.

GemfireDemoApplication.java
실행을 위한 클래스를 생성한다.

1
2
3
4
5
6
@SpringBootApplication
public class GemfireDemoApplication {
public static void main(String[] args) {
SpringApplication.run(GemfireDemoApplication.class, args);
}
}

GemfireConfiguration.java

gemfire를 사용하기 위한 설정을 모아두는 클래스 입니다.

1
2
3
4
5
6
7
8
9
10
11
12
13
14
15
16
17
18
19
20
21
22
23
24
25
26
27
28
@Configuration
@EnableGemfireCaching
public class GemfireConfiguration {

@Bean
public ClientCache gemfireCache() {
ClientCacheFactory cacheFactory = new ClientCacheFactory();
cacheFactory.addPoolLocator("192.168.0.6", 10334);
return cacheFactory.create();
}

@Bean("testCache")
public ClientRegionFactoryBean<String, TestCache> testCache(@Autowired ClientCache clientCache) {
ClientRegionFactoryBean<String, TestCache> regionFactoryBean = new ClientRegionFactoryBean<>();
regionFactoryBean.setCache(clientCache);
regionFactoryBean.setClose(false);
regionFactoryBean.setShortcut(ClientRegionShortcut.PROXY);
return regionFactoryBean;
}
@Bean("customer")
public ClientRegionFactoryBean<Long, Customer> customer(@Autowired ClientCache clientCache) {
ClientRegionFactoryBean<Long, Customer> regionFactoryBean = new ClientRegionFactoryBean<>();
regionFactoryBean.setCache(clientCache);
regionFactoryBean.setClose(false);
regionFactoryBean.setShortcut(ClientRegionShortcut.PROXY);
return regionFactoryBean;
}
}
  • @EnableGemfireCaching 으로 gemfire cache를 사용할 것임을 명시한다.
  • gemfireCache()에서 연결하기위한 Gemfire 서버의 정보를 설정한다.
    • 192.168.0.6은 이전 글에서 시작한 locator 정보의 ip이다.
    • 기본 local 접속이기때문에 별도의 username 과 password 는 설정하지 않는다. 하지만 별도의 서버를 구성할 경우에는 서버의 gemfire username과 password를 추가해야 한다.
  • customertestCache는 동명의 region에 대한 정보를 입력한다.
  • ClientRegionShortcut.PROXY는 애플리케이션에서 저장되는 정보를 어떠한 방식으로 처리할지를 지정하는 것으로 기본값음 LOCAL이다. LOCAL인 경우 값을 애플리케이션에서만 가지고 있게 되며 서버로 전송하지 않는다.
    • 별도의 서버를 두고 데이터를 공유할 경우에는 PROXY로 지정해줘야 한다.

Customer 저장 및 로드

Customer 는 org.springframework.data.repository.CrudRepository를 사용하여 데이터를 저장 및 삭제하는 예제다.

Customer.java
region 정보를 명시해주는 클래스다.

1
2
3
4
5
6
7
8
9
10
11
12
13
14
15
@Data
@ToString
@Region("customer")
@NoArgsConstructor
@RequiredArgsConstructor(staticName = "newCustomer")
public class Customer implements Serializable {
@Id
@NonNull
@Getter
private Long id;
@NonNull
@Getter
private String name;

}

Serializable은 java 끼리만 gemfire의 데이터를 공유할 경우에 사용하면 간편하다.
다만 다른 언어들과 데이터를 공유할 경우에는 DataSerializable 등을 구현하여줘야 한다.

CustomerRepository.java

1
2
public interface CustomerRepository extends CrudRepository<Customer, Long> {
}

Customer의 ID 타입인 Long 을 명시해준다.
gemfire 이외의 기술을 선택할 경우를 대비해 유연하도록 CrudRepository를 구현해준다.
findByName 등 jpa 에서 사용하던 형태의 메서드를 선언해 사용 가능하다.

CustomerController.java

Customer 의 정보를 저장하기 위한 Rest Controller 이다.

1
2
3
4
5
6
7
8
9
10
11
12
13
14
15
16
17
18
19
20
21
@RestController
@RequestMapping("customer")
public class CustomerController {
private final CustomerRepository customerRepository;

public CustomerController(CustomerRepository customerRepository) {
this.customerRepository = customerRepository;
}

@PostMapping("{key}")
public Customer put(@PathVariable("key") Long key, @RequestBody String name) {
Customer customer = Customer.newCustomer(key, name);
return customerRepository.save(customer);
}

@GetMapping("{key}")
public Customer get(@PathVariable("key") Long key) {
return customerRepository.findById(key).orElse(new Customer());
}

}

@RestController는 RestApi로 사용하기 위해 선언한다.
CustomerRepository의 Save 및 findById를 사용한다.

  • save와 findById는 자동으로 생성된다.
    Customer.newCustomer(key, name) 입력된 값으로 저장을 위한 신규 객체를 생성한다.
    orElse(new Customer()) 값이 존재하지 않을 경우 빈 객체를 리턴한다.

Customer 테스트

  • 저장테스트
1
2
3
4
5
> curl -X POST "http://localhost:8080/customer/1" -H "accept: */*" -H "Content-Type: application/json" -d "테스트"
{
"id": 1,
"name": "테스트"
}
  • 저장한 값을 리턴한다.
1
2
3
4
5
> curl -X GET "http://localhost:8080/customer/1" -H "accept: */*"
{
"id": 1,
"name": "테스트"
}
  • Region 정보 확인
1
2
3
4
5
6
7
8
9
10
11
12
gfsh>describe region --name=customer
Name : customer
Data Policy : replicate
Hosting Members : server1

Non-Default Attributes Shared By Hosting Members

Type | Name | Value
------ | ----------- | ---------------
Region | data-policy | REPLICATE
| size | 1
| scope | distributed-ack

TestCache 저장 및 로드

TestCache는 org.springframework.cache를 이용해 최소한의 설정값 만으로 Gemfire를 사용하기 위한 예제이다.

TestCache.java

TestCache는 일반적인 java entity 파일이다. 별도의 gemfire를 위한 설정은 존재하지 않는다.

1
2
3
4
5
6
7
@Data
@EqualsAndHashCode
@ToString
public class TestCache implements Serializable {
private String name;
private String addr;
}

TestCacheService.java

1
2
3
4
5
6
7
8
9
10
11
12
13
@Service
public class TestCacheService {

@CachePut(cacheNames = "testCache", key = "#key")
public TestCache put(String key, TestCache testCache) {
return testCache;
}

@Cacheable(cacheNames = "testCache", key = "#key")
public TestCache get(String key) {
return null;
}
}

@CachePut, @Cacheable 등 Spring Cache 를 이용해 Gemfire 의 Region에 데이터를 저장 및 로드 가능하다.
반드시 @Service 레벨이어야 한다. 또한, proxy 패턴을 이용하는 것이므로 같은 Class 내부에서 호출하는 부분은 캐싱되지않는다.
cacheNames = "testCache" 으로 region의 이름을 명시한다.
key = "#key"와 같이 매개변수명을 조합해 key를 지정할 수 있다.

TestCacheController.java

1
2
3
4
5
6
7
8
9
10
11
12
13
14
15
16
17
18
19
20
21
@RestController
@RequestMapping("cache")
public class TestCacheController {

private final TestCacheService testCacheService;

public TestCacheController(TestCacheService testCacheService) {
this.testCacheService = testCacheService;
}

@PostMapping("{key}")
public TestCache put(@PathVariable("key") String key, @RequestBody TestCache value) {
return testCacheService.put(key, value);
}

@GetMapping("{key}")
public TestCache get(@PathVariable("key") String key) {
return testCacheService.get(key);
}

}

TestCacheService를 이용해 데이터를 저장 및 로드 한다.

TestCache 테스트

  • 저장
1
2
3
4
5
> curl -X POST "http://localhost:8080/cache/1" -H "accept: */*" -H "Content-Type: application/json" -d "{ \"addr\": \"테스트주소\", \"name\": \"테스트이름\"}"
{
"name": "테스트이름",
"addr": "테스트주소"
}
  • 로드
1
2
3
4
5
curl -X GET "http://localhost:8080/cache/1" -H "accept: */*"
{
"name": "테스트이름",
"addr": "테스트주소"
}
  • Region 정보 확인
1
2
3
4
5
6
7
8
9
10
11
12
gfsh>describe region --name=testCache
Name : testCache
Data Policy : replicate
Hosting Members : server1

Non-Default Attributes Shared By Hosting Members

Type | Name | Value
------ | ----------- | ---------------
Region | data-policy | REPLICATE
| size | 1
| scope | distributed-ack

저장된 것을 확인할 수 있다.

참고

Spring Boot와 함께하는 Pivotal Gemfire 간단예제(1)

목차

  1. Pivotal Gemfire 다운로드 및 설치, 기본 설정
  2. Spring Boot를 이용한 Gemfire 이용

갑작스럽지만 애플리케이션의 Cache를 담당해주던 Redis를 Pivotal Gemfire 로 변경하기로 했다.

이런 결정에는 몇가지 이유가 존재했는데.

  • 현재 프로젝트에서 사용하는 클라우드 환경은 PCF(Pivotal Cloud Foundry)로 Gemfire를 기반으로 하는 PCC(Pivotal Cloud Cache)를 간편하게 서비스로 등록 및 사용할 수 있다.
  • 여건상 Redis 를 사용할 경우 PCF 환경의 외부에 Redis 서버가 존재할 수 밖에 없었다.

이왕 Pivotal 제품인 PCF 를 쓰는거 끝까지 Pivotal 제품을 사용하기로 맘 먹은 부분도 크다. (기술 지원의 일원화?!)

1.1. Pivotal Gemfire 란

Pivotal GemFire는 글로벌 레벨로 데이터 동기화가 가능한 인 메모리 데이터 그리드(In-Memory Data Grid)다. 오픈소스 버전으로는 Apache Geode가 존재한다.

주요기능을 요약하자면 다음과 같다.

  • 읽기-쓰기 처리량이 높음.(High Read-and-Write Throughput)
  • 대기 시간이 낮으면서 예측 가능.(Low and Predictable Latency)
  • 높은 확장성.(High Scalability)
  • 지속적인 가용성.(Continuous Availability)
  • 안정적인 이벤트 알림.(Reliable Event Notifications)
  • 데이터 저장소 상의 병렬화 된 애플리케이션 동작.(Parallelized Application Behavior on Data Stores)
  • 비공유 데이터 지속성.(Shared-Nothing Disk Persistence)
  • 소유 비용 절감(Reduced Cost of Ownership)
  • 클라이언트 / 서버를위한 단일 홉 기능(Single-Hop Capability for Client/Server)
  • 클라이언트 / 서버 보안(Client/Server Security)
  • 멀티 사이트 데이터 배포(Multisite Data Distribution)
  • 연속 쿼리(Continuous Querying)
  • 이기종 데이터 공유(Heterogeneous Data Sharing)

참고 : Gemfire Main Features

단순 Cache로 쓰기에는 넘쳐 흐르는 기능이 아닐 수 없다.

1.2. Gemfire 다운로드

Windows 운영체제 기반으로 설명한다.
나머지 운영체제의 설치는 여기서 확인 가능하다.

  • Pivotal 홈페이지에서 Gemfire 최신버전 다운로드
  • 원하는 폴더로 압축파일을 해제
  • bin 폴더를 path 에 추가.

1.3. GFSH 실행 및 로컬 실행

  • 명령 프롬프트 창 열기
  • gfsh(Gemfire Shell) 실행
1
2
3
4
5
6
7
8
9
10
11
12
Microsoft Windows [Version 10.0.18362.476]
(c) 2019 Microsoft Corporation. All rights reserved.

C:\Users\park>gfsh
_________________________ __
/ _____/ ______/ ______/ /____/ /
/ / __/ /___ /_____ / _____ /
/ /__/ / ____/ _____/ / / / /
/______/_/ /______/_/ /_/ 9.9.0

Monitor and Manage Pivotal GemFire
gfsh>

간단하다.

실행을 위해서는 locator 와 server 를 기동해야 한다.

  • locator 기동

gfsh>start locator --name=locator1

1
2
3
4
5
6
7
8
9
10
11
12
13
14
15
gfsh>start locator --name=locator1
Starting a Geode Locator in C:\Users\park\locator1...
..
Locator in C:\Users\park\locator1 on park-PC[10334] as locator1 is currently online.
Process ID: 19028
Uptime: 1 minute 1 second
Geode Version: 9.9.0
Java Version: 1.8.0_77
Log File: C:\Users\park\locator1\locator1.log
JVM Arguments: -Dgemfire.enable-cluster-configuration=true -Dgemfire.load-cluster-configuration-from-dir=false -Dgemfire.launcher.registerSignalHandlers=true -Djava.awt.headless=true -Dsun.rmi.dgc.server.gcInterval=9223372036854775806
Class-Path: D:\workspace\pivotal-gemfire-9.9.0\lib\geode-core-9.9.0.jar;D:\workspace\pivotal-gemfire-9.9.0\lib\geode-dependencies.jar

Successfully connected to: JMX Manager [host=park-PC, port=1099]

Cluster configuration service is up and running.
  • server 기동

gfsh>start server --name=server1

1
2
3
4
5
6
7
8
9
10
11
gfsh>start server --name=server1
Starting a Geode Server in C:\Users\park\server1...
..
Server in C:\Users\park\server1 on park-PC[40404] as server1 is currently online.
Process ID: 10964
Uptime: 1 minute 1 second
Geode Version: 9.9.0
Java Version: 1.8.0_77
Log File: C:\Users\park\server1\server1.log
JVM Arguments: -Dgemfire.default.locators=192.168.0.6[10334] -Dgemfire.start-dev-rest-api=false -Dgemfire.use-cluster-configuration=true -XX:OnOutOfMemoryError=taskkill /F /PID %p -Dgemfire.launcher.registerSignalHandlers=true -Djava.awt.headless=true -Dsun.rmi.dgc.server.gcInterval=9223372036854775806
Class-Path: D:\workspace\pivotal-gemfire-9.9.0\lib\geode-core-9.9.0.jar;D:\workspace\pivotal-gemfire-9.9.0\lib\geode-dependencies.jar
  • locator와 server 기동 확인

gfsh>list members

1
2
3
4
5
6
7
gfsh>list members
Member Count : 2

Name | Id
-------- | ---------------------------------------------------------------
locator1 | 192.168.0.6(locator1:19028:locator)<ec><v0>:41000 [Coordinator]
server1 | 192.168.0.6(server1:10964)<v1>:41001

여기까지가 Gemfire 기동 준비다.

다음에는 Gemifre 의 Table 이라고 할 수 있는 region 생성과 간단히 Spring Boot 를 이용한 Spring Data Gemfire Cache 샘플 프로젝트를 만들어 보겠다.

HTML 로 1px 미만 선 인쇄하기

픽셀과 포인트

브라우저에서 선을 표현하는 단위는 대부분 px 입니다. 픽셀이죠. 이는 상대적인 값입니다. 디지털 이미지를 화면에 재현하기 위한 단위로, 이미지를 이루는 가장 작은 단위를 뜻합니다.

픽셀을 많이 표현할 수 있다. = 해상도가 높다. 로 표현할 수 있으며, 이는 더 정교하게 이미지를 표현할 수 있다는 것을 의미합니다.

즉, 픽셀은 모니터의 해상도, 크기 및 OS(windows, MAC OS) 등에 따라 바뀔 수 있는 상대적인 값임을 알 수 있습니다.

하지만 인쇄의 영역에서 사용하는 단위인 pt는 다릅니다. 포인트라고 불리는 값은 절대적인 값입니다. 1인치를 72로 나눈 값으로 1pt = 1/72 inch = 약 0.3527 입니다.

오늘은 px로 표현한 웹 문서를 가지고 인쇄물로 출력하면서 발생한 이슈에 대해 이야기해보겠습니다.

굵은 1px

1px 굵기의 선으로 구성된 통계표를 출력해 받아본 고객에게서 다음과 같은 반응이 나왔습니다.

프린트 해서 봤더니 선이 너무 굵어요. 좀 더 얇게 해주세요.

당초 계획은 통계표를 웹에서 구성한 뒤 PDF파일로 제공하고, PDF파일을 고객이 프린터로 출력해서 제본하는 것이었습니다. 하지만 고객이 받아본 통계표 PDF는 고객 기준으로는 매우 굵은 선을 가지고 있었습니다.

다시 말하지만 통계표(table)의 선 굵기(border)는 1px 이었습니다.

간단한 html로 표현해보자.

1
2
3
4
5
6
7
8
9
10
11
12
13
14
15
16
17
18
<!doctype html>
<html>
<style>
table.one {
border: solid black 1px;
border-collapse: collapse;
}
td.one {
border: solid black 1px;
}
</style>
<table class="one">
<tr>
<td class="one">가나다라</td>
<td class="one">1234</td>
</tr>
</table>
</html>

검은색 1px 굵기의 선을 가진 테이블 입니다. 아래와 같이 표현됩니다.

얼핏 보기에는 얇아보이는 선입니다. 하지만 A4용지 혹은 B4용지로 출력해서 살펴본 고객은 한글(HWP)로 제작된 표에 비해 선이 굵어보인다고 했습니다. 실제로 양쪽 출력물을 비교해봐도 HTML 기반 출력물이 더 굵었습니다. 이때까지는 단순하게 생각했습니다.

0.5px 정도 주면 해결되겠네.

1
2
3
4
5
6
7
8
9
10
11
12
13
14
15
16
17
18
19
20
21
22
23
24
25
26
27
28
29
<style>
table.one {
border: solid black 1px;
border-collapse: collapse;
}
td.one {
border: solid black 1px;
}
table.two {
border: solid black 0.5px;
border-collapse: collapse;
}
td.two {
border: solid black 0.5px;
}
</style>
<table class="one">
<tr>
<td class="one">가나다라</td>
<td class="one">1234</td>
</tr>
</table>
<hr/>
<table class="two">
<tr>
<td class="two">가나다라</td>
<td class="two">1234</td>
</tr>
</table>

two 라는 클래스의 table을 하나 더 생성한 뒤 선의 굵기를 0.5px 로 줬습니다. 단순히 1px의 절반 굵기의 선이 생성되기를 기대했습니다. 하지만 어림도 없지. 1px 이하의 굵기는 화면에서 표현할 수 없는게 당연했습니다. (표현의 최소 단위니까…)

물론 일반적인 해상도로 봤을 때는 동일해보이지만 확대를 하게되면 두 테이블은 확연히 다른 선 굵기를 가지고 있음을 알 수 있습니다.

화면은 확대가 가능하지만 출력물은 확대를 할 수 없습니다. 슬슬 출력물에 대한 부담감이 몰려왔습니다. 하지만 막연히 PDF 또는 프린트 드라이버가 알아서 해주실거야! 라는 생각도 드는 순간 입니다.

아래는 위의 html을 PDF로 출력한 결과 입니다. (잘 안보일까봐 200% 확대 출력 했습니다.)

[PDF로 확인해보자!]

하느님 맙소사. 출력된 pdf에는 0.5px 과 1px 이 모두 1px 로 표현되는 것을 확인할 수 있었습니다.

이리저리 찾아본 결과 chrome 에서 print pdf로 pdf 를 생성할 경우 1px 미만의 선은 제대로 표현이 되지 않는다는 정보가 있었습니다. 이는 현재 기준으로도 수정될 가능성이 없어보이는 이슈로 headless chrome라이브러리인 puppeteer를 이용한 pdf export 시에도 마찬가지로 발생하고 있었습니다.

해결방안 테스트1 - 투명도

검색 결과 1px 미만의 선을 표현하기 위한 많은 개발자들의 노력과 답변들이 존재했습니다. 다만, 인쇄를 해야겠다라는 개발자는 많지 않았습니다.

우선 화면에서 표현이 된다는 CSS 트릭 부터 테스트해봤습니다. 바로 투명도를 이용한 방식 입니다.

1
2
3
4
5
6
7
8
9
10
11
12
13
14
15
16
17
18
<!doctype html>
<html>
<style>
.container {
border-style: solid;
border-width: 1px;
margin-bottom: 10px;
}
.border-100 {border-color: rgba(0,0,255,1);}
.border-75 {border-color: rgba(0,0,255,0.75);}
.border-50 {border-color: rgba(0,0,255,0.5);}
.border-25 {border-color: rgba(0,0,255,0.25);}
</style>
<div class="container border-100">1px</div>
<div class="container border-75">0.75px</div>
<div class="container border-50">0.5px</div>
<div class="container border-25">0.25px</div>
</html>

1px 미만의 선은 표현하기 어렵기 때문에 선의 투명도를 조절하여 얇게 보이도록 하는 트릭 입니다. 화면에서의 결과는 아래와 같습니다.

모니터 너머로 보이는 선은 정말 얇아보입니다. 0.25px 정도는 억지스러워보이지만 0.5px 정도까지는 눈감고 넘어가줄만 합니다.

이제 인쇄만 이쁘게 되면 됩니다.

[PDF로 확인해보자!]

PDF로 출력된 선은 뚜꺼워 보였으며, 얇아지지도 않았습니다. 투명해져가는 선은 단순히 프린터의 잉크가 떨어진 것 처럼 보일 뿐이었습니다.

화면과 출력물은 다르다 라는 교훈만 얻게 되었습니다.

해결방안 테스트2 - background-image 속성

CSS에는 border-image 속성이 존재합니다. 이는 image 파일을 border 에 줄 수 있는 것으로, HTML BOX를 디자인하기 좋아지는 속성 입니다.

구현은 간단하지 않은 관계로(현재 기억이 자세히 나지 않….) 히스토리만 적어보겠습니다.

  • 디자이너에게 0.5px 선 이미지를 요청해 받았습니다. (포토샵은 대단합니다.)
  • border-image 속성으로 표현합니다.
  • 필요에 따라 회전 시키며 사용합니다.

결과적으로는 PDF 상에 0.5px 를 표현하는데 성공했습니다. 이미지는 벡터로 랜더링 되는 선이 아니라 이미지 그 자체이기 때문에 문제가 없어 보였습니다.

다만 문제가 있었습니다.

구현 방식이 너무 복잡해, 수시로 편집 및 병합이 될 수 있는 통계표 테이블에 적용해주기는 어려웠던 것입니다. 때문에 절반의 성공으로 다음을 기약할 수 밖에 없었습니다.

해결방안 테스트 3

마지막 방법은 @media print를 이용해 print시 적용되는 css를 별도로 제작하는 것 입니다.
이 방법에는 약간의 트릭이 있습니다.

  • PDF print시 1px 미만이 표현되지 않는 문제 회피 필요.
  • @media print CSS에서 1px 미만의 숫자가 존재하지 않도록 기존의 CSS 수치에 일정 수치를 곱해준다.
    • 예> 0.5px 이 가장 얇은 선일 경우 = 모든 수치를 2배
    • 1px => 2px, 0.5px => 1px
  • 마지막으로 body 부분에 0.5배 축소 설정을 추가

아래는 예 입니다.

@media screen

1
2
3
4
5
6
7
8
9
10
11
@media screen {
.container {
border-style: solid;
border-width: 1px;
margin-bottom: 10px;
font-size: 14px;
}
.border-100 {border-width:1px}
.border-75 {border-width:0.75px}
.border-50 {border-width:0.5px}
.border-25 {border-width:0.25px}

@media print

1
2
3
4
5
6
7
8
9
10
11
12
13
14
15
@media print {
body {
transform: scale(.25);
}
.container {
border-style: solid;
border-width: 4px;
margin-bottom: 40px;
font-size: 56px;
}
.border-100 {border-width:4px}
.border-75 {border-width:3.05px}
.border-50 {border-width:2.5px}
.border-25 {border-width:1px}
}

문제없이 pdf 에서 원하는 굵기가 출력되는 것을 확인할 수 있었습니다.

결론

프로젝트에서는 세가지 방법 중 가장 만족도가 높았던 3안을 선택하여 제작했습니다. WEB의 화면을 PDF로 출력한다는 일반적이지 않은 작업이었지만 원하는 결과에 가까운 출력물을 얻을 수 있어 다행이었습니다.

모든 CSS의 굵기를 계산해서 만들어야 한다는 점이 어렵게 느껴질 수 있겠지만, SASS 등과 같이 CSS를 일괄 빌드할 수 있는 툴을 사용한다면 print CSS를 빠르게 생성할 수 있으니 충분히 쓸만해 보입니다.

Maven Dependency Scope의 종류

Dependency(의존성) 범위는 의존성의 transitive(전이)를 제한하고 다양한 빌드 작업에 사용되는 classpath에 영향을주기 위해 사용됩니다.

Maven에서 의존성을 선언하는 방법은 대략적으로 아래와 같습니다.

pom.xml

1
2
3
4
5
6
7
8
9
10
11
12
<project>
...
<dependencies>
<dependency>
<groupId>org.apache.maven</groupId>
<artifactId>foo-bar</artifactId>
<version>0.0.1-SNAPSHOT</version>
<scope>${scope}</scope>
</dependency>
</dependencies>
...
</project>

의존성에는 총 6가지의 scope가 존재합니다.

  • compile
    • 지정되지 않은 경우 사용되는 기본 scope 입니다.
    • Compile로 선언된 dependencies는 프로젝트의 모든 classpath에서 사용할 수 있습니다. 또한 이러한 의존성은 종속 프로젝트로 전파됩니다.
  • provided
    • Compile과 비슷하지만 프로잭트 실행 시 라이브러리에 대한 의존성을 JDK 또는 container(ex.tomcat) 가 제공 할 것으로 예상함을 나타냅니다.
    • 예를 들자면, Java Enterprise Editionweb Applicaton 을 빌드할 경우 web containerServlet API 및 관련 Java EE API 에 대한 class 및 의존성을 제공하므로 provided로 설정합니다.
    • 이 scope는 compile 및 test 시에만 사용되며 전이되지 않습니다.
  • runtime
    • compile에는 필요하지 않지만 실행 시 필요할 경우 사용합니다.
    • runtime이 선언된 의존성은 runtimetest classpath 에 존재하지만 compile classpath 에는 존재하지 않습니다.
  • test
    • application 을 정상적으로 사용하는데는 필요하지 않지만 test 컴파일 또는 실행 시 필요함을 의미합니다.
    • scope는 전이되지 않습니다.
  • system
    • scope는 명시 적으로 포함하는 JAR 을 제공해야한다는 점을 제외하고, provided와 유사합니다.
    • artifact 는 항상 사용 가능하며 repository 에서는 검색되지 않습니다.
  • import
    • <dependencyManagement> 영역 내부 pom 타입의 의존성 에만 지원됩니다.
    • 다른 프로젝트에서 관리되는 의존성 목록을 가져오기 위해서 사용합니다.
    • import scope로 선언된 POM 의 의존성 목록은 실제로 의존성의 전이에 참여하지 않습니다.

참고 : http://maven.apache.org/guides/introduction/introduction-to-dependency-mechanism.html#Dependency_Scope

Maven으로 Spring boot 배포 시 repackge 방지

개요

다른 프로젝트에서 Spring Boot Application 의 jar를 참조하여 사용하기 위해서는 Maven Deploy시 실행 가능한 jar가 아닌 Original jar 가 배포 되어야 함.

Spring Boot Maven Plugin

Maven을 이용하여 Spring Boot Application을 빌드 할 경우 특별한 경우가 아니라면 Spring Boot Maven Plugin을 활용하게 될겁니다. Spring Boot Maven Plugin은 아래와 같은 몇가지 기능을 제공합니다.

  • repackage : 자동 실행 가능한 jar 또는 war 파일을 만듭니다.
  • run : Spring Boot Application이 매개변수를 전달하는 여러가지 옵션과 함께 실행됩니다.
  • start and stop : Application 이 시작되기 전 integration-test 단계를 수행할 수 있습니다.
  • build-info : Actuator가 사용할 수있는 빌드 정보를 생성합니다.

이 중 이번에 살펴볼 부분은 repackage 입니다.

Repackaging an application

간단한 예제 입니다.

1
2
3
4
5
6
7
8
9
10
11
12
13
14
15
16
17
18
19
20
<build>
...
<plugins>
...
<plugin>
<groupId>org.springframework.boot</groupId>
<artifactId>spring-boot-maven-plugin</artifactId>
<version>2.2.1.RELEASE</version>
<executions>
<execution>
<goals>
<goal>repackage</goal>
</goals>
</execution>
</executions>
</plugin>
...
</plugins>
...
</build>

repackage는 Maven 수명주기의 package 단계에서 빌드 된 jar 또는 war를 다시 패키지(repackage)합니다. Plugin은 Application을 repackage 하면서 프로젝트의 dependency를 참고하여 필요한(종속된) 라이브러리를 포함시킵니다. 때문에 용량이 매우 크죠. repackage 되기 전 jar 또는 war 는 .original 확장자가 추가로 붙어 보존 됩니다.

실행 가능한 jar는 빌드 및 테스트시에 매우 유용합니다. 독립 실행이 가능하기 때문에 배포 역시 편리해지지요. 하지만 Application의 코드가 다른 프로젝트에서 사용되어야 한다면 어떨까요. 이런경우 다른 팀원과 공유해야 할 경우에 jar.original 파일을 건네주는 것은 의미가 없습니다.(다른 팀원도 Maven을 사용하고 있을테니까요.)

우리는 jar.original 파일을 사내 Maven Repository에 배포해야 합니다.

Deploy Maven Repository

여기서 사내 Maven Repository에 접근하기위한 Maven의 settings.xml 파일 설정 등의 설명은 하지 않겠습니다. 모든 설정이 잘 되어있다고 가정했을 경우 일반적인 배포 명령어는 아래와 같습니다.

1
mvn clean deploy

이제 pom.xml 에 dependency 설정만 해주면 되겠군요!

하지만 다른 팀원의 pom.xml에 정상적으로 dependency 설정을 완료하더라도 Class를 찾을 수 없다는 에러가 발생합니다. 이유는 간단합니다. original jar가 아닌 실행가능한 jar가 배포되었기 때문이죠.

실행가능한 jar(혹은 war)는 아래의 디렉토리 구조에서 알 수 있듯 jar.original과 다른 구조를 가지게 되며, dependency에 선언되더라도 Class를 찾을 수 없습니다.

또한, 실행이 되더라도 배포하기에는 너무나 거대한 용량을 가지게 되죠. 다른 팀원에게 제공되어야 하는 jar 는 실행이 가능하도록 repackage 되기 전의 결과물인 original jar 입니다.

Spring Boot Maven Plugin:repackage

모든일의 원흉(?)이라고 할 수 있는 Spring Boot Maven Pluginrepackage 문서를 살펴봅시다. Optional Parameters에 흥미로운 파라미터가 보입니다. 바로 skip이죠.

  • skip
    • Skip the execution.
    • Type: boolean
    • Since: 1.2.0
    • Required: No
    • User Property: spring-boot.repackage.skip
    • Default: false

실행을 Skip 할 수 있다는 군요. 해결책을 찾은 것 같습니다.

결론

Maven Deploy 시 Original jar 를 배포하기 위한 명령어는 다음과 같습니다.

1
mvn clean deploy -Dspring-boot.repackage.skip=true

참고 : https://docs.spring.io/spring-boot/docs/current/maven-plugin/repackage-mojo.html

Jenkins Blue Ocean 으로 배포하기

Jenkins 란

중요이슈

Windows 10 환경에서 Jenkins 로 SSH 를 이용한 배포를 하기 위해서는 SSH KEY가 필요하다.
원격지 서버에 ssh pub key 를 잘 등록하고
Git Bash 에서도 비밀번호 없이 ssh 가 원활하게 접속되는것을 확인했지만 이상하게도 Jenkins 상의 shell script 에서는 ssh 접속 명령 이후 멈춰버리는 현상이 발생했다.

  • Git Bash 로는 접속 가능
  • Jenkins Job 에서는 접속 불가
    • Blue Ocean 및 일반 Job 에서도 연결되지 않음.

원인을 파악하기 위해 비슷한 이슈를 구글링해보았지만 나오지 않았다…

해결

ssh 에 -vvv 옵션을 준 뒤 jenkins Job을 실행했다.
분명 SSH_Agent 를 사용했으며, SSH 인증 Credential 을 생성하여줬음에도 불구하고 id_rsa 파일을 엉뚱한 곳에서 찾으려고 노력하고 있었다. (털썩)
ssh keygen 을 Git Bash 에서 진행했기 때문에 id_rsa 파일은 C:/Users/Park/.ssh 폴더에 들어있었지만 Jenkins 에서 검색중인 폴더는 C:\\WINDOWS\\system32\\config\\systemprofile/.ssh/ 였다. 이유가 뭐야….

  • C:/Users/Park/.ssh 내부의 파일을 복사
  • C:\\WINDOWS\\system32\\config\\systemprofile/.ssh/로 이동

해결완료.

IntelliJ 단축키모음

IntelliJ 단축키 모음

기본적인 단축키 모음입니다.
숙달되면 마우스 의존도가 좀 줄지 않을까 싶은데 맥과 윈도우를 모두 외우려니 여간 힘든게 아니군요… 맥을 버리면 편해지려나

java 개발자라면 강추 드리는 툴 입니다.

[Git]Unlink of file Failed. Should I try again? 문제 해결법

사건개요

직장 후배가 eclipsesynchronize git을 사용해 remote Server의 데이터를 pull 해오던 와중에 아무런 메시지 없이 데이터가 가져와지지 않는 현상이 발생했습니다.
평소 eclipse를 사용하지 않는 관계로 툴 내부에서 확인이 어려웠고 결국 git bash 를 열었습니다.

git bash

우선 당겨와 보았습니다.

1
$ git pull origin master

데이터를 잘 가져오던 중 아래의 메시지와 함께 멈춰버렸습니다.

1
> Unlink of file '파일명' failed. Should I try again? (y/n)

해결방안

해당 문제는 보통 파일을 다른 프로그램이 사용중일 경우에 발생하며, 파일을 잡고있는 다른 응용프로그램을 우선 종료해야합니다.

This could mean that another program is using the file, which is preventing git from “moving” the file into or out of the working directory when you are attempting to change branches.

I have had this happen on Windows Vista where eclipse is the program “using” the file. The file may not be actually open in eclipse but may have been opened by a process run by eclipse.

In this event, try closing the file in any applications that might have used it. If that doesn’t work, completely exit any applications which may have opened the file.

이것은 다른 프로그램이 파일을 사용하고 있다는 것을 의미 할 수 있습니다. 이는 git이 브랜치를 변경하려고 할 때 작업 디렉토리 안팎으로 파일을 “이동”하지 못하게합니다.

나는 Windows Vista에서 eclipse가 파일을 “사용”하는 프로그램을 사용하고있다. 파일은 이클립스에서 실제로 열리지 않을 수도 있지만 이클립스에서 실행되는 프로세스에 의해 열렸을 수 있습니다.

이 경우 파일을 사용한 적이있는 응용 프로그램에서 파일을 닫으십시오. 그래도 작동하지 않으면 파일을 열었을 수있는 응용 프로그램을 모두 종료하십시오.

마무리

가장 의심스러웠던 후배 컴퓨터의 eclipse를 종료하였고. 다시 git pull 을 실행하자 diff 창이 정상적으로 떴으며, 문제가 해결되었습니다.
이번 문제는 eclipsesynchronize가 중간에 꼬이면서 발생한 것으로 보입니다. eclipse를 재실행 한 뒤에는 해당 문제가 발생하지 않았습니다.

CSRF 이해하기

Express 팀의 csrf
csurf 모듈은 암호화 기능의 사용에 대해 의문을
가지는 이슈가 자주 올라옵니다. 이는 CSRF 토큰이 작동하는 방식을 잘못 이해해서 발생하는
의문이라고 생각합니다. 어째든, 빠르게 진실을 알아봅시다!

이 문서를 읽고, 질문이 있거나 무언가 잘못된 것이 있다고 생각하면 이슈를 생성하세요!

CSRF 공격은 어떻게 하는거죠?

공격자가 자신의 피싱 사이트에 다음과 같은 AJAX 버튼 또는 폼을 만들어 놓고 타겟의
사이트로 위조 요청을 보냅니다:

1
2
3
<form action="https://my.site.com/me/something-destructive" method="POST">
<button type="submit">여기를 누르면 공짜 돈을 드립니다!</button>
</form>

이것이 문제가 되는 이유는 공격자가 AJAX 등을 통해 DELETE 메서드와 같은 요청을 원본
사이트로 문제없이 보낼 수 있기 때문입니다. 만약 원본 사이트에서 세션 데이터나 중요한
개인 정보를 다룬다면 아주 중대한 문제입니다. 만약 기술적인 지식이 전무한 사용자가
이러한 상황을 만난다면 신용카드 정보 또는 사회 보장 정보를 입력할지도 모릅니다.

CSRF 공격을 어떻게 방어하나요?

JSON API만 사용

제한된 CORS 환경에서 JavaScript를 통한 AJAX 호출만 사용합니다. 이 방법은 <form>
JSON 같은 정보를 전송할 수 없다는 점을 이용하여 요청 값을 JSON만 허용하는
방법입니다. 이 방법은 상기한 형태의 폼을 통한 공격 가능성을 제거합니다.

CORS 비활성화

CSRF 공격을 배제하는 가장 첫 번째 방법은 cross-origin 요청을 비활성화하는 것입니다.
만약 CORS를 허용하려면 사이드 이펙트(부수효과)를 발생시키지 않는 OPTIONS, HEAD, GET
메서드만 허용시켜야 합니다.

불행히도, 위의 메서드를 통한 요청들은 JavaScript를 사용하지 않으므로 모두 차단되지
않습니다. (따라서 CORS를 적용할 수 없습니다)

헤더의 레퍼러(referer) 확인

불행히도, 레퍼러 헤더를 확인하는 것은 약간 좋지 않은 문제가 있습니다. 하지만 원본
사이트가 아닌 해커의 사이트로부터 들어오는 요청은 언제나 막습니다. 이 방법은 문제가
발생할 여지가 없습니다.

예를 들어, 레퍼러 헤더가 자신의 서버가 아닐 땐 세션을 로드할 수 없습니다.

GET 메서드가 사이드 이펙트를 일으키지 않게하기

GET 요청이 데이터베이스의 그 어떤 관련된 데이터도 변경할 수 없게 해야 합니다.
이는 주로 초보자들이 많이 하는 실수이며 무려 어플리케이션의 CSRF 공격을 넘어서 수 많은
공격을 가능하게 만듭니다.

POST 사용 자제

왜냐하면 <form>GETPOST 메서드만 허용하기 때문입니다. 이러한 방식 대신
PUT이나 PATCH, DELETE 같은 메서드를 사용하면 공격자가 사이트를 공격할 수 있는
방법이 크게 줄어듭니다.

Method Override 사용하지 않기

많은 어플리케이션들이 기본 폼에 PUTPATCH, DELETE 요청을 지원하기 위해
method-override를 사용합니다.
하지만, 이것은, 요청을 완전히 취약점이 없는 취약점으로 변경했습니다.

그러니 어플리케이션에 method-override를 사용하지말고 그냥 AJAX를 쓰는게 낫습니다.

오래된 브라우저는 지원하지 않기

오래된 브라우저는 CORS와 보안 정책을 지원하지 않습니다. 단순히 오래된 브라우저(주로
기술적인 지식이 부족한 컴맹들이 사용하며, 이들은 공격하기 더 쉽습니다)의 지원을 끊는
것 만으로도 CSRF 공격 경로를 최소화 할 수 있습니다.

CSRF 토큰

UNBEKNOWN
아아, 마지막 해결법은 바로 CSRF 토큰을 사용하는 것입니다. CSRF 토큰이 어떻게
작동하냐구요?

  1. 서버가 클라이언트로 토큰을 전송합니다.
  2. 클라이언트가 폼을 토큰과 함께 제출합니다.
  3. 토큰이 올바르지 않으면 서버에서 요청을 거부합니다.

공격자는 타겟 사이트에서 CSRF 토큰을 얻는 방법을 찾으려 할 것이고 이 때 JavaScript를
쓸 것입니다. 따라서 사이트가 CORS를 지원하지 않는다면 공격자가 CSRF 토큰을 얻을 수
있는 방법이 없습니다. 취약점을 제거하세요.

반드시 AJAX를 통해 CSRF 토큰에 접근할 수 없도록 하세요!
/csrf 같이 바로 토큰을 받아올 수 있는 라우트는 만들지 말고, 특히 그 라우트에 CORS를
지원하지 마세요.

토큰은 추측할 수 없어야 하며, 이렇게 하면 공격자가 몇 번의 시도만으로 토큰을 얻기
힘들어집니다. 또한, 따로 암호학적인 보안이 필요하지 않습니다. 공격은 서버의 브루트 포스
공격이 아닌 사용자가 모르는 사이에 한두 번의 클릭으로 이루어집니다.

BREACH 공격

여기선 salt를 함께 제공해야 합니다. BREACH 공격은 아주 간단합니다: 만약 서버가
HTTPS+gzip를 통해 같거나 비슷한 응답을 여러 번 한다면, 공격자는 응답 본문의 컨텐츠를
예측할 수 있습니다. (HTTPS를 완전히 쓸모없게 만듭니다) 해결법? 각 응답을 약간씩 다르게
만들면 됩니다.

그러므로, CSRF 토큰은 각 요청을 기준으로 매번 다르게 생성됩니다. 하지만 서버는
각 요청에 포함된 토큰이 유효한지 확인할 수 있어야 합니다:

  1. 암호학적으로 안전한 CSRF 토큰은 이제 서버에 의해서만 알려진, (가정) CSRF
    “비밀”입니다.
  2. 이제 CSRF 토큰은 secret과 salt의 해시입니다.

추가적인 내용은 다음을 참고하세요:

참고로 CSRF은 BREACH 공격을 해결 하지 않습니다. 하지만 모듈은 간단히 요청을
무작위화 시켜 BREACH 공격을 완화시켜줍니다.

Salt는 안전한 암호화를 할 필요가 없습니다

왜냐하면 클라이언트는 salt를 알고 있기 때문입니다!!!
서버는 <salt>;<token>를 전송할 것이고 클라이언트는 서버로 같은 값을 요청에 포함하여
보낼 것 입니다. 그리고 서버는 <secret>+<salt>=<token>이 맞는지 확인할 것입니다.
salt는 반드시 토큰과 함께 전송되어야 합니다. 이렇지 않다면 서버는 토큰이 확실한지
확인할 수 없습니다.

이것은 간단한 암호학적인 방법입니다.
더 많은 방법들이 있지만 더 복잡하며 이 문제에 대해 효과적이지 않습니다.

토큰 생성은 빨라야 합니다!

왜냐하면 토큰은 매 요청마다 생성되어야 하기 때문입니다!
이 작업은 간단히 Math.random().toString(36).slice(2) 이렇게만 해도 충분하며
뿐만 아니라 매우 고성능입니다! 각 요청에 대해 OpenSSL과 같은 암호학적으로 암호화된
토큰은 필요하지 않습니다.

secret(데이터)은 비밀일 필요가 없습니다

하지만 이것은. 데이터베이스를 사용하는 세션 스토어를 쓴다면 클라이언트는 절대 DB에
저장된 secret을 읽을 수 없습니다. 하지만 쿠키 세션을 사용한다면 secret은 쿠키에
저장되고 클라이언트에게 보내질 것입니다. 그러므로, 쿠키 세션이 httpOnly
사용하도록 하고 클라이언트가 secret을 client-side JavaScript로 읽을 수 없도록 해야
합니다!

CSRF 토큰을 잘못 사용하는 경우

JSON AJAX 요청에 CSRF 토큰을 사용

전술했듯이, 만약 CORS를 지원하지 않고 API가 JSON에 한정되어 있다면, AJAX 요청엔
CSRF 토큰을 포함시킬 수 있는 방법이 없습니다.

CSRF 토큰을 AJAX로 전송

어플리케이션에 GET /csrf 같은 라우트는 절때 만들어선 안되며 CORS를 활성화해서도
안됩니다. CSRF 토큰을 API 응답 본문에 포함하여 전송하면 안됩니다.

결론

최근 웹은 점점 JSON API를 사용하는 추세이며 브라우저는 더 많은 보안 정책으로 더
안전해지고 있기에 CSRF의 중요성은 점점 떨어지고 있습니다. 오래된 브라우저의 사이트
접속을 차단하고 많은 사이트 API를 JSON API로 변경하면 근본적으로 CSRF 토큰을 사용할
필요가 없어집니다. 그러나 안전을 위해, 언제든 가능할 때, 특히 구현에 사소한 상황이
아닐 경우 여전히 이것들을 구현하는 것이 좋습니다.

오타나 오역이 있을 수 있습니다. 문제를 발견했다면, 수정해서 PR을 넣어주세요. 많은
도움이 됩니다!